I am sorry it has seemed like I have dropped off the face of the planet but some things had to take priority right now. I know we have all had those times, right. I really have been pooped from the end of the year activities at work and I will not be as lax this summer as I thought I would be.
Therefore, I have decided that the quickest and most efficient way to share what I find on this here Internet is to begin to post to facebook primarily. I hope you guys don't mind. It is something I am trying and if you don't like it just let me know. I want to know how you get your information best so please take a moment to let me know. It would be a huge help.
Wednesday, May 19, 2010
Saturday, March 6, 2010
Free and Frugal Outtings
Here is a fun post I found over at Multiples and more blog. I'm sure it is all the nice weather we have been having that makes me want to get out and do fun stuff.
The idea of outings with your multiples may sound daunting if yours are still in diapers, but as you reach preschool and elementary school age you'll be looking for cultural and other events for family entertainment. The cost can also be daunting, so ask moms of older children and watch your local newspaper for low-cost entertainment options for your family of multiples. Here's what's working for our family:
Arts & Crafts: If you have a Lakeshore Learning Store in your area, they offer FREE art projects every Saturday for ages 3 and up. Michael's Arts & Crafts also offer projects every Saturday; some have a small charge for materials, but many are FREE.
Building Clinics: Both Home Depot and Lowe's offer FREE Saturday workshops for kids 6 and up. Each session, they build a project with wood and tools; kids also receive an apron and goggles. My son loves these programs!
Circus: Ringling Bros. and Barnum & Bailey Circus offers a FREE ticket to anyone under 1 year of age; while you have to request the ticket in your babies' first year of life, it can be redeemed anytime. Hold onto it until they're older, and you'll enjoy it more.
Movie Theatres: Starting in May and June, many of the national chains offer FREE summer movie programs. I tried this out last summer, thinking it was okay if my 3-year-old twins couldn't make it through, since it was free, but they did great.
Museums: Find museums in your area that offer FREE days, like these museums in the Target Events & Museums Program. For museums that charge admission, look for Family Membership packages that benefit larger families (sometimes the family size is 6), and be sure to visit enough times during the year to make it worth the cost.
Public Library: We've enjoyed magic shows, puppet shows, concerts, and more through our local library, all for FREE.

Theme Parks: If you're a military family, you're eligible for FREE admission at the Anheuser-Busch Parks (Sea World, Sesame Place, Busch Gardens) and special discounted tickets at DisneyWorld. If you're not a military family, one way to get discounted tickets is through a group rate. I bought 20 tickets to Sesame Place one summer (they throw an extra in for FREE), and sold them to two other families in my MOMS Club. When you have a family with multiples, getting to 20 isn't that hard!
One of the ways I've made outings easier with my three (twins + big brother) is to bring along another adult or even a parent and child. That way, we have as many hands as their are kids, for crossing streets or getting through crowds, and you have an adult to chat with. Remember to pack your own snacks, drinks, and even lunch if you're doing day outings with your family; this can save you a lot of money over eating out at museums, zoos, etc.
What kinds of low-cost outings have you done with your multiples? What other tips can you share for making them more manageable?
For more frugal fun and money-saving ideas, come over to Moneywise Moms. Have a great weekend!
The idea of outings with your multiples may sound daunting if yours are still in diapers, but as you reach preschool and elementary school age you'll be looking for cultural and other events for family entertainment. The cost can also be daunting, so ask moms of older children and watch your local newspaper for low-cost entertainment options for your family of multiples. Here's what's working for our family:
Arts & Crafts: If you have a Lakeshore Learning Store in your area, they offer FREE art projects every Saturday for ages 3 and up. Michael's Arts & Crafts also offer projects every Saturday; some have a small charge for materials, but many are FREE.
Building Clinics: Both Home Depot and Lowe's offer FREE Saturday workshops for kids 6 and up. Each session, they build a project with wood and tools; kids also receive an apron and goggles. My son loves these programs!
Circus: Ringling Bros. and Barnum & Bailey Circus offers a FREE ticket to anyone under 1 year of age; while you have to request the ticket in your babies' first year of life, it can be redeemed anytime. Hold onto it until they're older, and you'll enjoy it more.
Movie Theatres: Starting in May and June, many of the national chains offer FREE summer movie programs. I tried this out last summer, thinking it was okay if my 3-year-old twins couldn't make it through, since it was free, but they did great.
Museums: Find museums in your area that offer FREE days, like these museums in the Target Events & Museums Program. For museums that charge admission, look for Family Membership packages that benefit larger families (sometimes the family size is 6), and be sure to visit enough times during the year to make it worth the cost.
Public Library: We've enjoyed magic shows, puppet shows, concerts, and more through our local library, all for FREE.
Theme Parks: If you're a military family, you're eligible for FREE admission at the Anheuser-Busch Parks (Sea World, Sesame Place, Busch Gardens) and special discounted tickets at DisneyWorld. If you're not a military family, one way to get discounted tickets is through a group rate. I bought 20 tickets to Sesame Place one summer (they throw an extra in for FREE), and sold them to two other families in my MOMS Club. When you have a family with multiples, getting to 20 isn't that hard!
One of the ways I've made outings easier with my three (twins + big brother) is to bring along another adult or even a parent and child. That way, we have as many hands as their are kids, for crossing streets or getting through crowds, and you have an adult to chat with. Remember to pack your own snacks, drinks, and even lunch if you're doing day outings with your family; this can save you a lot of money over eating out at museums, zoos, etc.
What kinds of low-cost outings have you done with your multiples? What other tips can you share for making them more manageable?
For more frugal fun and money-saving ideas, come over to Moneywise Moms. Have a great weekend!
Hello Neighbor, What Do You Say? It's Going To Be A Happy Day!
Hey friends, this one is a free tag and quick how to for giving your neighbors a little gift. We know our immediate neighbors pretty well but a resolution for the year is to get to know all the neighbors on our block so here's fun little tag and idea to do just that. You really don't need some snazzy tag to go out and just talk to your neighbors. I am well aware of this but if you are going to make the effort to go over you might as well make them something yummy to let them know you're just glad they're there. Anyway here's the sweet little stuff from joy ever after blog. Enjoy.
//UPDATE The muffin boxes were purchased from The Container Store. Thanks! //
Last weekend I put together this little project and delivered it to my neighbors. These muffins are my absolute favorite, lemon & blueberries. I use any excuse to make them whenever possible.


For anyone interested in making a little treat for your neighbor, I am including a download of the cards I made. Nothing is more fun than giving a bribe to get on your neighbor's good side.
To get the downloads click here please and scroll tot he bottom and click on this picture.

love your neighbor…
…by giving them muffins!//UPDATE The muffin boxes were purchased from The Container Store. Thanks! //
Last weekend I put together this little project and delivered it to my neighbors. These muffins are my absolute favorite, lemon & blueberries. I use any excuse to make them whenever possible.
For anyone interested in making a little treat for your neighbor, I am including a download of the cards I made. Nothing is more fun than giving a bribe to get on your neighbor's good side.
To get the downloads click here please and scroll tot he bottom and click on this picture.
Friday, March 5, 2010
Stencil With Freezer Paper
I have been thinking of fun ways to use my cricut machine and one way is as a stencil. Seems easy enough right? Well here is something much less expensive than vinal paper which runs around $7.99 in craft stores. So I will be trying this bad boy out soon.
Stencil With Freezer Paper One of the projects at this Friday's Chicago Craft Social will be freezer paper stenciling. I'm helping lead this table, so I needed to give it a test drive and make up some samples. You know how a project usually has four tedious steps you tolerate and one step that's super fun? I think this is one of the few where all of the steps are fun. Or maybe that's just me. I'm now in the grips of stencil mania. I'm stenciling everything.
To stencil your own stuff:
Buy a roll of freezer paper (approx. $3.99) or beg a piece from the guy in the meat department at your grocery store. Draw your design on it and cut it out with an X-acto knife. Then iron the paper, shiny side down, onto the fabric you're going to stencil. Iron another sheet to the back of the fabric to keep the paint from soaking through. You can use the iron setting that corresponds to the fabric you're stenciling.
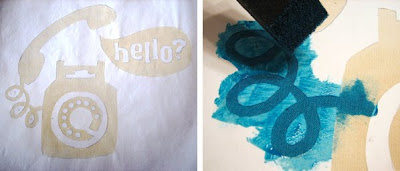 With a foam brush, stenciling brush, kitchen sponge, or other paint brush, apply fabric paint to the cut-away areas. I used Jacquard brand textile paint from the local art store.
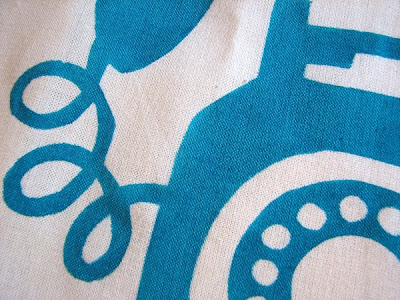
 Let the paint dry (use a hairdryer if you're the impatient type, like me.) Peel the freezer paper off. Set the paint by following the directions on the jar — usually ironing will set it. Ta da.
Stencil With Freezer Paper
 One of the projects at this Friday's Chicago Craft Social will be freezer paper stenciling. I'm helping lead this table, so I needed to give it a test drive and make up some samples. You know how a project usually has four tedious steps you tolerate and one step that's super fun? I think this is one of the few where all of the steps are fun. Or maybe that's just me. I'm now in the grips of stencil mania. I'm stenciling everything.
To stencil your own stuff:
Buy a roll of freezer paper (approx. $3.99) or beg a piece from the guy in the meat department at your grocery store. Draw your design on it and cut it out with an X-acto knife. Then iron the paper, shiny side down, onto the fabric you're going to stencil. Iron another sheet to the back of the fabric to keep the paint from soaking through. You can use the iron setting that corresponds to the fabric you're stenciling.
 With a foam brush, stenciling brush, kitchen sponge, or other paint brush, apply fabric paint to the cut-away areas. I used Jacquard brand textile paint from the local art store.
 Let the paint dry (use a hairdryer if you're the impatient type, like me.) Peel the freezer paper off. Set the paint by following the directions on the jar — usually ironing will set it. Ta da.
Wednesday, March 3, 2010
All Things Family
I read quite the post and thought I would share. It only took me about 12 hours to look at all these fun blogs linked to this one. Enter at your own risk!

Welcome to the February 23, 2010 edition of the All Things Family blog carnival. This week, we focused on frugal and money-saving ideas. If you have an article that you would like to submit for a future edition, please check out the All Things Family Blog Carnival.

Frugal Ideas for Parents:
Jessica Hill, one of my favorite dollar store crafters, presents mad in crafts: Make crayons with dollar store molds posted at mad in crafts, a good use for those cute novelty molds they always have at the dollar store.
Here’s a fun and frugal idea! Abigail Bailey presents Make children’s play furniture from milk cartons posted at abigailscraftshowto.com
Shannon presents Low Cost Party Planning Solutions posted at Partyelf, saying, “Here are some low cost solutions to planning a great birthday party for your child,” and provides ideas for Personalized Party Favors on a Budget posted at Partyelf, saying, “Getting personalized party favors for your child’s birthday party does not have to cost a fortune. Here are some low cost ideas starting around $1.”
Speaking of parties, Char Polanosky sent us ideas for 5 Ways to Save Money on Kids Party Decorations posted at Celebrate It, saying, “Creative ways to stretch your birthday party budget!”
Char Polanosky presents Making Kids Lunch Fun with Bento Box Lunches posted at Raising A Healthy Family, saying, “Save money by packing your kids lunches in fun bento style containers.”
Linette G. presents some super cute cupcakes How To Train Your Dragon~Viking Hat Cupcakes posted at The Kid’s Birthday Fun Review, saying, “These cupcakes are quick and easy, perfect to make just for fun or for a How to Train Your Dragon Party.”
Family Potluck:
Mariana Ashley presents 50 Incredible Ikea Hacks for College Kids posted at AccreditedOnlineColleges.org .
Pamela Jorrick presents Personality posted at Blah, Blah, Blog, a discussion of personality types and how they apply to her.
Gina @ MoneywiseMoms presents Guest Post: Retirement Savings for Stay-at-Home-Moms posted at Moneywise Moms
Karen Eisenbraun presents Plant A Garden For Healthier Children posted at Healthy Theory.
Fred Lee presents Your Public Library: Better than Disneyland posted at Parenting Squad
Sandra Lopez presents 80 Awesome Ideas for All Your Old or Unwanted Books posted at Online Colleges.net
Dana presents An encounter with owls posted at Roscommon Acres, a blog about a nature walk with her children and what they found.
That concludes this edition.

Welcome to the February 23, 2010 edition of the All Things Family blog carnival. This week, we focused on frugal and money-saving ideas. If you have an article that you would like to submit for a future edition, please check out the All Things Family Blog Carnival.

Frugal Ideas for Parents:
Jessica Hill, one of my favorite dollar store crafters, presents mad in crafts: Make crayons with dollar store molds posted at mad in crafts, a good use for those cute novelty molds they always have at the dollar store.
Here’s a fun and frugal idea! Abigail Bailey presents Make children’s play furniture from milk cartons posted at abigailscraftshowto.com
Shannon presents Low Cost Party Planning Solutions posted at Partyelf, saying, “Here are some low cost solutions to planning a great birthday party for your child,” and provides ideas for Personalized Party Favors on a Budget posted at Partyelf, saying, “Getting personalized party favors for your child’s birthday party does not have to cost a fortune. Here are some low cost ideas starting around $1.”
Speaking of parties, Char Polanosky sent us ideas for 5 Ways to Save Money on Kids Party Decorations posted at Celebrate It, saying, “Creative ways to stretch your birthday party budget!”
Char Polanosky presents Making Kids Lunch Fun with Bento Box Lunches posted at Raising A Healthy Family, saying, “Save money by packing your kids lunches in fun bento style containers.”
Linette G. presents some super cute cupcakes How To Train Your Dragon~Viking Hat Cupcakes posted at The Kid’s Birthday Fun Review, saying, “These cupcakes are quick and easy, perfect to make just for fun or for a How to Train Your Dragon
Family Potluck:
Mariana Ashley presents 50 Incredible Ikea Hacks for College Kids posted at AccreditedOnlineColleges.org .
Pamela Jorrick presents Personality posted at Blah, Blah, Blog, a discussion of personality types and how they apply to her.
Gina @ MoneywiseMoms presents Guest Post: Retirement Savings for Stay-at-Home-Moms posted at Moneywise Moms
Karen Eisenbraun presents Plant A Garden For Healthier Children posted at Healthy Theory.
Fred Lee presents Your Public Library: Better than Disneyland posted at Parenting Squad
Sandra Lopez presents 80 Awesome Ideas for All Your Old or Unwanted Books posted at Online Colleges.net
Dana presents An encounter with owls posted at Roscommon Acres, a blog about a nature walk with her children and what they found.
That concludes this edition.
Tuesday, March 2, 2010
Taffy........That YOU Made. Oh yes you can!
OK. Don't think me crazy and just read the post. It's super cute and looks relatively easy to do so read on before you throw it out the window! I would try this with my kids only I think, not my preschoolers from school. It would be like a bad sesame street episode. Read on! I think I'll make this for my sister. She adores taffy and she would be oober impressed by the home made factor. These would be great too as a favor at a birthday party.
Skip to My Lou Blog
Welcome to our Sweat Sweet Shoppe! If you are alarmed by red dye, excessive amounts of sugar and under age workers turn away now!

If not, stick around and see how we made loads of homemade taffy!

Here's our recipe
3 tablespoons cornstarch
1 cup light corn syrup
1 1/3 cups water
2 tablespoons butter (plus lots extra to butter hands)
1 teaspoon salt
1 - .21oz (6g) package unsweetened, fruit-flavored drink mix (like Kool-Aid) (we used cherry)
1/2 teaspoon vanilla
Butter large jelly roll pan or a cookie sheet with sides.
In a medium saucepan, stir together the sugar and cornstarch. Add corn syrup, water, butter and salt and stir well until butter is melted. Bring to a boil over medium heat and stop stirring. Cook mixture until candy thermometer read 250 degrees F (120 degrees C). This takes some time to get it to 250 degrees. Once it approaches 250 degrees watch very closely because it cooks quickly at the end. Immediately remove from heat. Carefully stir in vanilla and drink mix. Stir well. We should have stirred ours more-- notice some bits of drink mix (dark spots) on our taffy. Pour mixture onto buttered baking pan. Allow to cool enough to handle, about 10 minutes.

Then pull...and pull...butter hands again...pull...

and stretch...pull...more hand buttering...pull...

It will become more opaque and lighten in color depending on the attention span of your workers! This takes about 10-15 minutes of pulling.

Pull into long ropes and cut with buttered scissors.

and cut!

Wrap pieces of taffy in pieces of waxed paper

and give it a good twist on each end.

Finished!

Sweet!!

Skip to My Lou Blog
Welcome to our Sweat Sweet Shoppe! If you are alarmed by red dye, excessive amounts of sugar and under age workers turn away now!
If not, stick around and see how we made loads of homemade taffy!
Here's our recipe
Homemade Taffy
2 1/2 cups white sugar3 tablespoons cornstarch
1 cup light corn syrup
1 1/3 cups water
2 tablespoons butter (plus lots extra to butter hands)
1 teaspoon salt
1 - .21oz (6g) package unsweetened, fruit-flavored drink mix (like Kool-Aid) (we used cherry)
1/2 teaspoon vanilla
Butter large jelly roll pan or a cookie sheet with sides.
In a medium saucepan, stir together the sugar and cornstarch. Add corn syrup, water, butter and salt and stir well until butter is melted. Bring to a boil over medium heat and stop stirring. Cook mixture until candy thermometer read 250 degrees F (120 degrees C). This takes some time to get it to 250 degrees. Once it approaches 250 degrees watch very closely because it cooks quickly at the end. Immediately remove from heat. Carefully stir in vanilla and drink mix. Stir well. We should have stirred ours more-- notice some bits of drink mix (dark spots) on our taffy. Pour mixture onto buttered baking pan. Allow to cool enough to handle, about 10 minutes.
Directions:
Once the taffy has cooled enough to handle, butter hands and begin pulling. (It starts kind of translucent)Then pull...and pull...butter hands again...pull...
and stretch...pull...more hand buttering...pull...
It will become more opaque and lighten in color depending on the attention span of your workers! This takes about 10-15 minutes of pulling.
Pull into long ropes and cut with buttered scissors.
and cut!
Wrap pieces of taffy in pieces of waxed paper
and give it a good twist on each end.
Finished!
Sweet!!
Monday, March 1, 2010
Wall Art Display
As the thought of an upcoming foster child continues to cloud my mind I was thinking of the ways I could encourage and foster lots of self esteem for the little person God brings us. Displaying and showing we are proud of this little person I know will be so important so here's a little post from How Does She blog. She has some great tips for displaying artwork and I'm sure there will be lots of it around our house!
 This is Alison’s idea to take lots of art, shrink it on the computer and put it into one collage. Child’s art 18 into 2!


OR


How Does She display kid’s art? I knew I could find a few ideas, I had no idea I would find this many!!! I am excited to present all these awesome ideas – I am so inspired to get my kids to make more art, just so I can display it!
#1 Collage It
This is Alison’s idea to take lots of art, shrink it on the computer and put it into one collage. Child’s art 18 into 2!#2 Group together on the wall
I love this idea because it is so easy to update whenever you want and it looks GREAT!
The Style Files shares this picture. I love all the colors against the white wall. You can get these curtain holders at Ikea, not online, unfortunately, but if you live by one – lucky you!
The Land of Nod
Cookiemag suggests taking pictures of the art and grouping the pictures together into a display on a cork board
#3 Treat it as art
Frame it Lil Davinci art cabinet
Lil Davinci art cabinetThis frame allows you to easily switch pictures and even store some behind the most recent art being displayed
Blissfully Domestic has a great tutorial on displaying framed art.
Turn it into art on Canvas!!! This is one of my favorite ideas – pretty much anything on canvas just looks classy.
mykidsartoncanvas has the idea above on their website, you can order from them
OR
get it for free at Canvas People – click here!
Turn it into custom wall paper art, a laptop skin, or a removable sticky picture at SticViews - You can still get one free – see this post to find out how!
Turn doodles into a real work of art - Lizette from Fine Doodles  does some amazing work with your kid’s doodles – you gotta check out her website!
does some amazing work with your kid’s doodles – you gotta check out her website!#3 Take it with you and show it off!
Analiese will turn it into a clay pendant for you
or Totally out of Hand will turn it into silver or gold jewelry!
Snap Totes will turn images into bags or pillows – picture your kid’s art on the bag above.
Little Birdie Secrets has a tutorial on how to turn you child’s drawing
into a stuffed toy
I made one for my son and he thinks it is the coolest thing!
Other ideas I found but don’t have pictures for are:
shrink and mod podge onto coasters
Use clipboards as frames – easy to change out
hang them all over your garage walls
use them for wrapping paper
display on picture ledges
upload them to a book printing company and have a nice book of art
laminate them and use as placemats
turn them into a calendar – click here to see how to get a FREE ONE
cover your coffee table w glass and slide drawings underneath
use a plastic tablecloth over your dinner table and slide drawings underneath
have them made into postage stamps
cut up and use as gift tags
Subscribe to:
Posts (Atom)