Too Many Good Things Out There Not To Share Them With You!

Tuesday, December 29, 2009

Cute Little Bow or Brooch


Another from Skip to my Lou. I think I will make a few for my niece. 


I am thrilled to share the cutest little project from Calli at Make It Doblog, a felt poinsettia hair clip.  I am hoping to make one of these today for my daughter to wear on Christmas Eve.
Be sure to visit Make It Do, her blog is overflowing with creative ideas. Calli says, "In this blog I want to explore how happiness can come from simple things, and how good old fashioned hard work and resourcefulness might just be making a welcome comeback…."
Calli writes...
Yesterday, my girls and I were working on a few Christmas gifts for their friends.  One thing led to another and I found myself making yet another flower pin.  This time a Poinsettia.  I loved this project and ended up making two for my girls, and plan on making more.  They are perfect as a broach or as a hair clip.
IMG_8361
Here’s what you will need:
  • Small amount of red wool felt (I used scraps from another project.)
  • Very small amount of green wool felt (also scraps)
  • button
  • pin or hair clip
  • freezer paper
  • template  here is mysimple template, but I also found this wonderful template from Kaboose.  It has a few more petals than my simple flowers, but that might look even better, here’s the link: Kaboose Poinsettia Template
IMG_8373
1.  Start by tracing your pattern onto the paper side of a piece of freezer paper.
IMG_8375
2.  Cut out your template, and place it on your wool, waxy/shiny side down.
IMG_8378
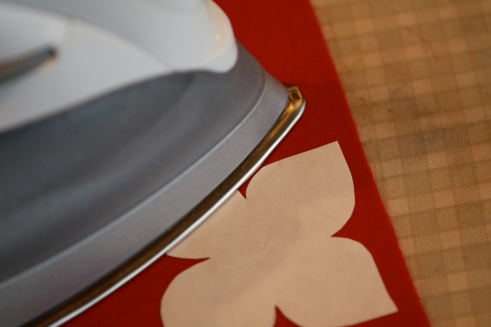
3.  Using an iron set to wool, iron on the template.  It will gently stick to your fabric.
IMG_8382
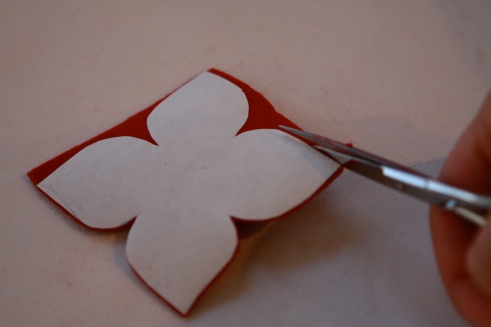
4.  Using good scissors, cut out around the template.
IMG_8385
5.  Peel the template away from the wool.  It doesn’t leave a mark.  Isn’t that cool?
IMG_8387
6.  Repeat with the smaller flower.  I just set the button down to see how it would look.
IMG_8388
7.  Cut a 1 1/4 inch circle out of red or green felt.  Cut two small slits in the circle, just wide enough to slip a hair clip through.  This is for the back of the flower, on which to attach the clip or pin.
IMG_8394
8.  Using just the bottom flower, stitch the circle around the back of the flower.  I used white thread to show the stitching better in the photo… Yah, that was it.  It wasn’t because my machine was already threaded with white and I was lazy.  That wasn’t the reason at all.  I was just thinking of you.
9.  Somehow I missed taking a picture of cutting out the green center of the flower.  I cut my green with a fluted edge, which was a little tricky and requires good scissors.  You can also cut it in a circle, but in that case, I would choose a button with a fluted edge.  I was dying to try pinking scissors, but I don’t own any.  So I just cut the fluted edge out carefully.  Sometimes you just need to make it do.  The finished green center was a 7/8 inch circle fluted.
IMG_8405
10.  Layer just the smaller top flower, with green center and button on top.  And stitch together going through all three layers.
IMG_8406
11.  Glue the bottom and top flowers together using hot glue.
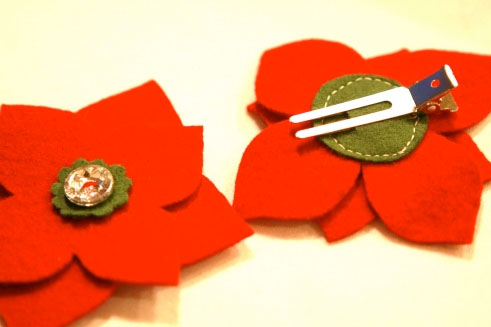
There’s a front and back view, with a hair clip attached.  I like that this flower is flexible, I can easily pull out the hair clip and I can slip in a broach pin to wear on a sweater, hat or scarf.
IMG_8362
Here it is pinned on a sweater…
IMG_8422
Thanks to an idea a reader told me about on Craftzine, I also thought this would make a perfect topper for a gift.  That way the wrapping is actually like giving another gift.  (Using cheap yarn is much, much cheaper than ribbon!)
Monday, December 28, 2009

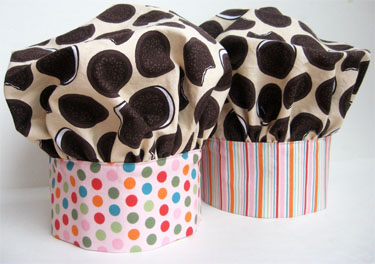
Cute Little Chef Hat


This one comes from Skip to My Lou.
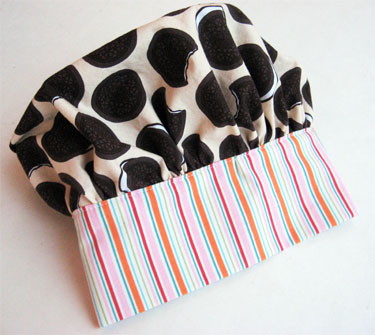
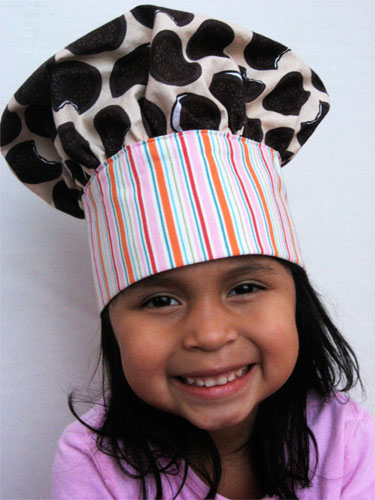
These chef hats were  gifts for a couple of sweet girls. I packaged them with cookie decorating supplies (and hopefully will make them matching aprons in the future).

Chef Hat Instructions

Supplies:

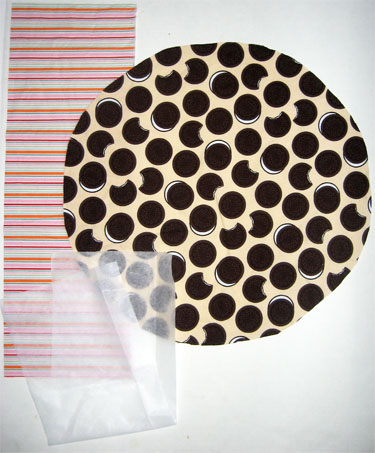
1 -  18" circle
1 -  8" X 24" rectangle
1 - 8" X  24" lightweight to medium weight iron on interfacing
dental floss
1/2 inch Velcro (about 12")
3" piece of double fold bias tape

Instructions:

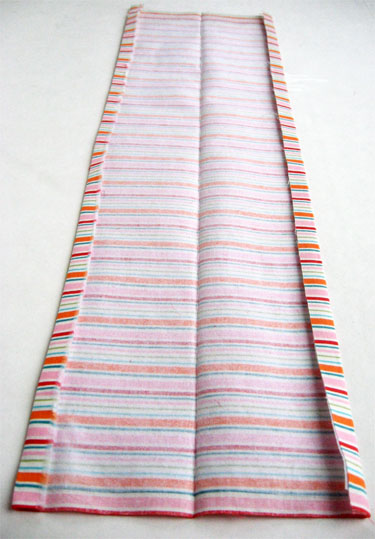
Iron interfacing to 8" X 24" piece following manufacture's instructions. Press  fabric in half lengthwise and press each edge under 1/2".

Fold piece right sides together, starting 1/2" down from open side, stitch across each end. Turn right side out.

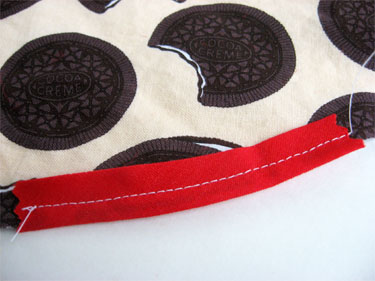
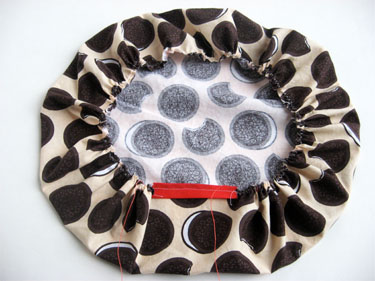
Stitch a 3" piece of bias tape around an edge of the circle.

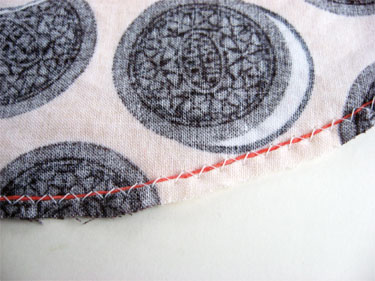
Zig zag stitch over a piece of dental floss starting and stopping on each side of bias tape.

Gather.

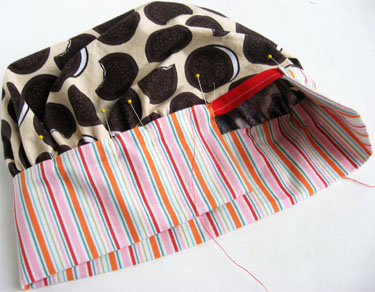
Pin band piece around the gathered edge. Find center of band and center of top piece and begin pinning there.  Adjust gathers until the band fits the gathered edge, starting at stopping about a 1/4" over the bias tape on each side (notice how the 1/2" that wasn't sewn on each end neatly slips around the bias tape). Pin heavily to keep in place.  This takes some adjusting but it is so nice to have all the unfinished edges covered.

Sewing very close to the edge, sew band to top of hat, removing pins as sewing to keep band flat. It might be necessary to slightly pull the band to keep it smooth.

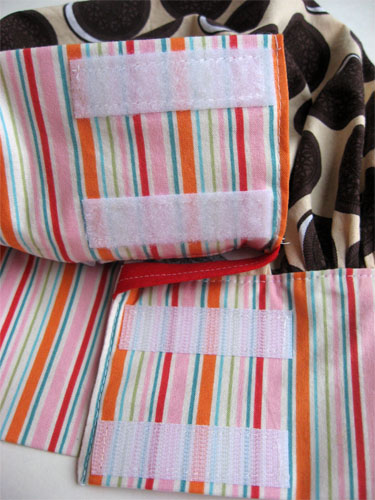
In the back fold left side over as far as the bias tape opening will allow on top of right side. Place Velcro in this overlapping area and sew all four pieces to hat band.

Sew along each edge of each end if desired, to close area placed over bias tape.

Finished!

Sunday, December 27, 2009

Jeweled Frame


Disney at Ruffles & Stuff came up with a quick and easy (and cheap!) way to make glamorous gemstone frames. Her secret ingredient? Those flat glass marbles you can find in the flower arranging section of the dollar store. This is possibly the best use of these marbles I’ve ever seen! [click here for bejeweled frame tutorial]
You can find a huge array of frames at the dollar store, as well as the glass marbles you need for this project. Disney recommends hot glue for this project because it doesn’t remove the spray paint. Also, in her example shown above, she used embellishments like faux flowers and bows.
Project Estimate:
  • Frame, $1
  • Glass marbles, $1
  • Spray paint, optional, $1 and up or on hand
  • Additional embellishments, on hand or $1 and up
  • Hot glue, on hand
Total: $2 and up

Thursday, December 24, 2009

Shameless Endorsement

Don't you just love your friends? I love that I have a good number of friends that if I called right now and asked for something they would be there and do everything in their power to help. I count myself as blessed beyond measure for this. It's hard not to have family close by and I know that will be more true than I know once the kiddos start showing up. I thank God for the support and love I have from the people who are a part of my church. They really have NO idea how they reflect Christ to me and show me how to be a good mommy when the time comes.

Soooo I have one such friend that is FANTASTIC. She really is beautifully talented and is a huge part of our preschool ministry while raising 5 children and has started a little sewing business that has really done so well. I know she's super woman right? She should feel that way anyway. Her name is Kristy Wilder and she has started a business called Twinkie Boutique. She sells boutique style clothes and accents. Can I tell you how much I love her creations! She is really a wealth of creativity. So go check out her blog and get something for your little people!  


Isn't her stuff amazing? And this is just a little taste. So here's to my shameless endorsement. Love you Kristy! Oh! And Merry Christmas Eve everyone!

Tuesday, December 22, 2009

We love apothecary jars!

I used to have the prettiest apothecary jars in my bathroom. That was until a sweet husband of mine dropped two of them and they shattered into a million pieces over the tile bathroom floor. Don't you just love when that happens. It took forever to get those little glass pieces up. I have not been able to replace them because I got them on sale at Kirkland Home so you can guarantee they won't be there now. That's why I was pretty excited to see this fun little project from The Shabby Chic Cottage. I have to admit I am a little jealous I didn't think of it myself but no matter, as long as I can get them. 


Here's How:
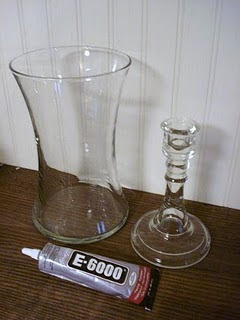
It took me forever to find the perfect candlestick, because I wanted one that looked simliar to the turned wooden ones that I adore.


Just remember to leave it alone for 24 hours (that's always the hardest part).


Then you get a beautiful jar. Mine was $4 - $2 for each piece. You can get cheaper components if you look hard enough.


They don't have lids like mine did but they are pretty inexpensive. So have fun making these things and I'll be thinking about what I can do next with this fun idea!

Monday, December 21, 2009

All About a Clipboard

I never have been able to make my sweet clipboard look good. I tried writing on it but it ended up looking like a bad Napoleon Dynamite poster. Enter Scrap book paper. My happy friends over at Skip to My Lou have a great way to make a fun addition to your organizing tool box or a fun teacher gift.


 I used  small 6"X 9" clipboards  found  at OfficeMax ($1.69). The notepads are 5" X 8" 50 sheet Jr. size writing pads, found at Wal-mart (6 notepads were only $2.50).


I tried these two ways:


First cut decorative paper to fit the clipboard.  For my clipboards 6" X 9" worked perfectly.  I took the extra time to make a template that fit around the top of the clip (a little bit of a pain).  I have also seen where there is just a rectangle shape cut to fit around the clip. My paper looked like this.


Paint the back of the paper with Mod Podge Paper (Matte) or spray with the Elmer's Spray Adhesive. If you are using spray adhesive also spray the clipboard. Cover the the clip with masking tape to keep it clean. Pay special attention to make sure which ever method used that the edges of the paper are completely covered. Working quickly, place the paper onto the clipboard. This is a bit tricky. It is okay to lift up and reposition until it matches all of the edges properly. Be careful not to stretch the paper. Smooth paper and make sure the entire piece of paper is secured.  When I had a spot along the edge that wasn't adhered, I lifted it slightly and added more glue.  Allow to dry at least 15 minutes before putting on top coat. Round off corners with scissors.



Give the top of the paper a light coat of Mod Podge Paper in matte  or two coats of spray matte finish.  I have to say I like the paper feel and look so I prefer the Krylon spray matte finish.


Glue a matching piece of decorative paper to the top of the notepad. Any glue will do.


To give the clipboard an extra nice touch I added a metal label holder. I taped them on with a piece of clear tape exactly where I wanted them and then my husband drilled holes in the metal clip so they could be attached with the brads included in the package.


I painted the metal holders and brads with gloss paint.  Open the clip as far as you can so you can attach the metal label holder and spread the brads apart on the back side of the clip.


Finished! I think I will put the recipient's name in the label holders.


So there you go. Frugal, fun and oh so pretty. Have fun out there!

Sunday, December 20, 2009

Such Cute Personalized Photo Magnets

Photos are so fun, right? My sweet husband is a documentary photographer when he isn't blowing me away with his mad graphic design skills. So you can imagine our house has quite a few photos in it. Our computer has thousands. This one is one of my favorites. There's just something about capturing an important moment or communicating so many words with a single image. Photos are emotional, stale, amazing, appealing, fascinating, and at times ironic. They are iconic to those they capture and keep a piece of history for the person taking the photo and all those who take a look at it afterward.

So that's where these really easy, frugal, and chic photo magnets come in. I found them over at Vanilla Joy.

This is a great idea to give as a Christmas gift or anytime gift really. I'm thinking I will give these to a few sweet family members who love photos as much as I do.


Just buy yourself a little sheet of magnetic canvas $5 for an 18''x24'' from Roberts Crafts. Just pick a pic place it on the magnetic sheet, trim and you're done. I think I will do mine with names on the pics with some scrapbooking stuff. Lots of fun to you and don't forget to have a little fun this holiday season!  

Sunday, December 13, 2009

All Those Christmas Cards

Every year I get wonderful Christmas cards from family and friends. I really like Christmas cards. They are simple and while they're not necessary, it's at least a way to stay in touch with people over the holidays. My grandmother had 15 children so you can imagine trying to keep up with everyone. So we send out a little Christmas card and newsletter to feel a little more connected. So when I was on one of my favorite sites Dollar Store Crafts I found a great idea to use those 101 Christmas cards that have been collecting.


So here's how: 
Project Estimate:
  • 3 greeting cards per house, on hand
  • Battery-operated tea lights, 2 for $1
  • Tissue paper (optional), on hand
  • Tape & scissors, on hand
Total: $.50 per house (unless you prefer unlit houses, and then this is FREE!)

It's even look on well by all the tree-huggers of the world. Now who wouldn't love decorations like that?

Steps:
1. From your stash of cards, find three that are identical in size. If you have to trim a couple to make them all the same, be sure to save the scraps, as you can use those to make your window panes.

2. On one card, cut out a small window on each side. On the other card, cut out a window and a door. Cut down one side and top of a long rectangle for the door, being sure you can fold it to the side to make it look like it's half way open.
 3. Using card stock or your extra card scraps, make window panes on your window openings. Tape the pieces on the inside of the cards. You can tape sheets of tissue paper if you'd like as well.

4. Tape the two cards together from the inside to create a box shape. 

5. Cut the third card in half along the existing crease and tape each half to the sides of the box. Attach the two pieces together to create the finished roof.
6. To make my houses look cute and whimsical, I put tape on the top corners of each roof.


 7. To create a snowy effect, place fiberfill around your card houses.

8. I also tried lighting up my houses by putting in an enclosed tea light candle. To make things safer, I think I would put in a battery-operated tea light candle instead. It looks so pretty at night!
Have fun if you have time to make this. I think we will do it while I am in Knoxville with the rents. Happy crafting and Merry Christmas!

Thursday, December 3, 2009

Free 2010 Calendar

I happily get the Pillsbury newsletters in my recipe inbox each week. They really have some fantastic recipes and they are updating and adding to them all the time. So you can imagine my excitement when I looked in my inbox today and there awaited my happy email. Then what to my wondering eyes would see, but a free calendar with 12 happy recipes. So here's the link to go and get yours and happy 2010!