Too Many Good Things Out There Not To Share Them With You!

Sunday, February 28, 2010

Look What I Can Do........Shhhhh....... You Can Do It Too!

Many of my dear friends who I have let into my craft room know I'm an organizing junkie. I just feel better when I know where something is and I'm not wasting time trying to find it. Enter ribbon. I have tried to organize ribbon in so, so, so many different ways and always come up short ........dum dum dum. Until NOW! Check out this super easy way to make a ribbon organizer and moreover easy to take the spools on and off. Why didn't I think of that? I think I will paitn mine whit to go with the white theme going on in my craft room.

DIY Ribbon Organizer

It seems such a shame for something as pretty as ribbon to be shut up in a closet, wouldn’t you agree? I have this fantasy of storing all my wrapping in plain sight, as a sort of functional art, and this super simple project has me one step closer.
look at this pretty ribbon, all it asks is to be set out and appreciated
I’d call this a tutorial, but really, it seems too simple to be a tutorial. It’s just a trip to a couple of stores I’m guessing you already visit. A few minutes later, you’ll be set with a place to store every spool of ribbon or twine in your closet. Should we get going then?
Start with a trip to the thrift store.

Have you ever noticed many candlesticks have a hole that goes all the way through? Do a little searching and I’m sure you’ll find several. On my last trip I picked up five. They are ripe for the picking, my friends. If you don’t like your color options, pick up a spray can of Krylon at the hardware store and do a quick paint job when you get home.

Often you’ll need to unscrew something. It wouldn’t hurt to have a Philips and flathead with you when you go.

The next stop is the craft store. Pick out a wooden dowel that makes a snug fit. Mine was pretty snug. The wood was soft enough that I just screwed it right into the base. If your dowel is a little thin, you have options. Pick up a wooden disk while you’re at the craft store. Drill a hole so you can use the wooden disk as your base, then plant the dowel in the hole (again, make sure it’s a snug fit) and slide the candlestick right over. You also have the choice of picking up one of these from the hardware store, they’re called allthreads and work great for this project if you prefer them to a dowel.
That’s it. Once you find a dowel or rod that fits, there’s nothing left to do but stack the candlestick back together, and display in your studio, office, or right on your mantle.

Saturday, February 27, 2010

Pottery Barn hack job and back to crafts.....for now. I love you sweet pottery barn but you kill me with your pries so I must, and I do mean MUST make it on my own. Love ---me. Tear. I know you love PB too so here's how to do a PB lamp shabby chic cottage style.

It's no surprise that I'm hacking Pottery Barn. We went in a few days ago, and I found some things I love. One was this lamp. $100? Uhh... no.
I also fell in love with this shade. $59? No, thank you very much.
But, you know me, I can always find a cheaper alternative!
I already had the shade, it used to be my dining room light, picked up at Goodwill for $2 back last summer. Yesterday, when I went thrifting with {Living With} Lindsay, she spotted the lamp for $7. She is genius!
Using my favorite cheap white spray paint (thanks to Mother Nature for letting the sun finally shine today), I gave the lamp acouple of realllllly good coats. Then I roughed it up with sand paper.
 Madeline and I mixed up a little raw umber paint with some Ralph Lauren glaze. Mixing in some paint means that not every distressed finish in your house looks exactly the same. It gives it a little more depth and variation.
Wipe it off in circles, so that you don't have wiping marks left over.
 Once finished distressing, set aside to let dry.
Next go make some tea. Or coffee. Either will work.
I used leftover tea bags from making today's batch of sweet tea.
{We go through a gallon a day!}
Once it's cooled, "paint" a couple of coats of tea onto the shade. If your shade is already the color you want, skip this step. Blot with paper towels to help absorb the excess. Set aside to dry - or blow dry it with a hair dryer (I'm impatient!). I did this while my spray paint was drying.
Just like with last week's curtains, translate your favorite phrase (mine is from a love note Mr. SCC wrote me years ago), and print it off, I used this font at 175 point.
Trim your words and tape them to the inside of the shade.
Put the shade on a lamp and painted it, just like the curtains.
I used a Paris postmark rubber stamp for the postmarks.
A $159 lamp for less than $10. I'm. In. Love.

Friday, February 26, 2010

Ice Cream Cone Cakes

This is another secret blog I love. I get good ideas for activities for my class geared around children's literature. Instilling a love for learning and reading is soooooo very important and super fun might I add. I can't wait to get more ideas from her in the future!

Ice Cream Cones w/o the Mess!


I had E's Valentines Day party today, and it was a huge success! The kids loved their pony bead heart necklaces. I was afraid the craft would be too hard for the kids, but they did great and there were enough moms there to help.

(Isn't my friend's little girl adorable? She and her twin sister are always so well-dressed. :)

The book My Heart is Like a Zoo was also a huge hit. Besides the book and the craft, I was responsible for dessert. At first I planned on keeping it simple with heart jello jigglers. My mom always made these for my class and I have fond memories of "finger jello".

IMG_4305

But then my sister Beth @ The Stories of A to Z twittered (tweeted?) a picture of these Valentines Faux Ice Cream Cones and I fell in love. She hadn't blogged about it yet, so I googled for a recipe and found one at Easy Cake Ideas. It looked easy, so I decided to give it a try. Here's what I did:

The Meringue Tops (do this the night before if possible)

IMG_4285

Ingredients:
  • 3 large egg whites
  • ¼ teaspoon cream of tartar (mine turned out fine without)
  • ¾ cup granulated sugar
  • Piping bag or gallon size Ziploc bag
1. Preheat oven to 200° F

2. In a large bowl beat the egg whites until foamy. Make sure your bowl and mixer are very clean. Any grease will ruin the meringue.

3. Add the cream of tartar and continue beating until soft peaks form.

4. Add the sugar a little at a time and continue beating until the mixture holds stiff peaks when the whisk is lifted from the bowl.

5. Line a cookie sheet with parchment paper or tin foil (not wax paper).

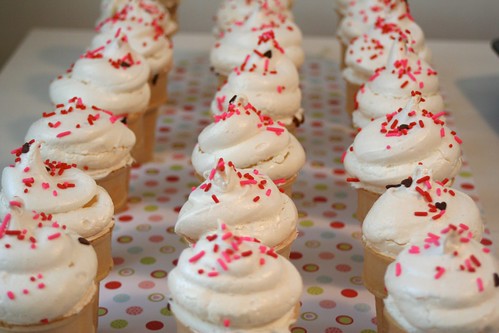
6. Using a piping bag without a tip or a gallon size Ziploc with a 1” hole snipped in the corner, pipe a meringue 'ice cream' swirl in roughly the same diameter as the opening of the ice cream cone.

7. Top each with sprinkles.

8. Bake for 1 ½ hours or until the meringue is dried out and crisp to the touch.

9. Crack the oven door and leave to finish drying out overnight.

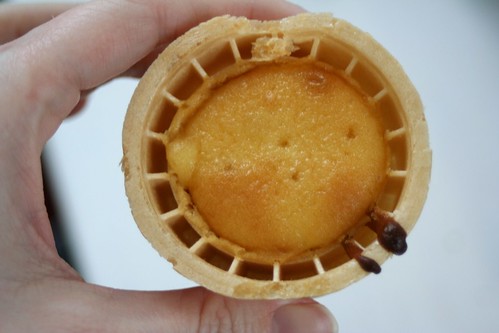
The Cake Cones

IMG_4287

1. Using a cake mix, follow the directions up to pouring into the pans.

2. Line up the ice-cream cones on a cookie sheet.

3. Spoon the cake batter into the cones, filling only to the line where the neck of the cone widens out.

4. Bake at 350° F for about 22-25 minutes, until a cake tester comes out clean.

5. Cool completely.

Assemble!

IMG_4290

Spread icing (I used store-bought) on top of the cake cone and then top off with one of the meringue cookies.

IMG_4298

Now they're all ready to pass out to a class of sweethearts! These ended up being a huge hit with E's classmates. They got a kick out of the pretend ice cream, and I heard two little boys exclaim "it's not messy!"

The whole process took most of the afternoon yesterday and much of the morning, so I don't plan on doing this again anytime soon, but I am proud with the way they turned out. If you want a simpler solution, my sister used marshmallows inside the cones instead of cake and added M&Ms to the meringue.

I read Amilia Badilia's First Valentine, Valentine Mice, and Mouse's First Valentine for my class on our special party day just in case you wanted to know.

Wednesday, February 24, 2010

Batch Cooking from Simple Bites

Back to the Basics: Batch Cooking

Post image for Back to the Basics: Batch Cooking
Photo by Martin Kingsley
Quite a few of you mentioned that you’d like the topic of freezer meals and batch cooking covered in our Back to the Basics series. I’m definitely not an expert in this field, but it’s something I want to incorporate more in my own home management, so this is a refresher post for me as well.
Cooking in advance has the serious advantage of saving time and money. You’ll waste less food (especially the perishables), and you’ll save money by doubling up your efforts on the spoils brought home from the store.
It’s also healthier, because you won’t need to buy convenience foods that are chock full of MSG, preservatives, sodium, and other unpronounceable chemicals.
There are a few methods of batch cooking, but essentially, it involves cooking a lot of food in advance. You can cook enough food to warrant freezing and stockpiling, and you can prepare scratch ingredients, helping you to cook without the fake ingredients found in so many store-bought items.
Here are a few tips for the different methods of cooking ahead of time.

Freezer Meals

Freezer meals are entire meals prepped in advance, and then frozen for later use. They can ether be completely cooked, so that all they need is thawing and reheating, or you can prepare most of the steps in advance, so that all that’s left is cooking the meal.

Advantages:

This is a great time saver. You can stockpile loads of meals for future use, such as when you’re expecting a newborn in your life. Or you can simply have a few meals on hand, so that when life is a bit busy, all you need to do is shop your freezer.

Disadvantage:

You need the space. If you want to do freezer meals hard-core, you might want to check your local Craigslist to find a used deep freezer for your garage. I have a simple second freezer in the kitchen (it’s the size of a compact fridge that’s popular in college dorms). It provides some extra space, but not a ton.

Helpful Tools:

Plenty of freezable dishes, such as those foil casserole dishes you can find in your grocery store. I prefer large resealable plastic bags because they take up less space. Vacuum sealers are great, too, though I don’t have one.

Good Freezer Meal Recipes

Chicken Nuggets
Fannie Farmer’s Classic Baked Macaroni and Cheese
Beef Stew
Chicken Tetrazzini with Caramelized Onions (make the alfredo sauce from scratch – it’s very easy)
End of Summer Vegetable & Fresh Herb Casserole
One Skillet Lasagna
Chicken Enchiladas
Spinach Black Bean Lasagna
Ground Beef and Tomato Manicotti
Chicken and Wild Rice Soup
You can also search the freezable meals at My Recipes or the make ahead recipes at Whole Foods.

Once A Month Cooking

Some families cook all their meals for the month in one day. I haven’t personally done this, but I hear it works well when you plan in advance and you have extra hands to help.
You can create a two-week menu plan, then buy all your ingredients on one shopping day. Get your perishables and produce at the farmer’s market, and everything else at the grocery store.
Make sure you double all the amounts for each recipe, so that you have enough for the month. You could even quadruple the recipes and have plenty for lunch.
Then you clear an entire day early in the month, and cook, cook, cook. It’s a tough day, but then you’re done for the month! Freeze the meals, label and date them well, and all you have to do is thaw, reheat, and serve.

Cooking & Freezing Staples from Scratch


Photo by thebittenword.com

Even if you don’t like the idea of freezing entire meals in advance, you can still batch cook and freeze staple ingredients.

• Once or twice a month, roast a whole chicken, then cube the meat and store it in half cup or whole cup quantities in resealable bags. Label the quantity and date — you might think you’ll remember, but believe me, you won’t.
• Now, you’ve also got plenty of chicken broth to freeze. Also store this in whole cup quantities, and label it well.
• I also like to match batches of homemade cream of chicken soup, and freeze for recipes later. The stuff in boxes and cans are chock full of fake ingredients and sodium.
• Brown and drain ground beef the day you buy it at the market, and you can also store this by the cup for freezing. This way, you’ll also use less meat per meal, because it’ll be an ingredient instead of the main feature.
• I also like to throw dried pinto beans into the Crock Pot to make a simple side dish that will last us about two weeks. You can mash them into refried beans, too.
• We’ll get to canning later, which will cover lots of veggies and sauces. But you can also make basic marinara sauce, pizza sauce, and salsa in bulk, and freeze them for later. Jump on these things now, while tomatoes are abundant, fresh, in season, and cheap!
It can feel overwhelming if you try to jump on all these ideas at once, so just pick one or two, and gradually add more freezer meals to your agenda. For me, I’ll be freezing my chicken ingredients, ground beef, and a few meals for the next few months.

Tuesday, February 23, 2010

I have been wanting to do one of these for a while now. I knew I should be able to make one for myself and found a cute tutorial done by what looks like a high school kid? Check out her pics behind her in her photos. They made me laugh. So here is her post and I warn you there are a LOT of pictures so it may seem a bit long but if you are good at scrolling -- no worries.

From craftster.com
Here's the goal:


Sorry about the mediocre tutorial, it’s my first try!

I've seen these all over for 30$+, so I tried to make my own!
I found out after making about 8 that you can buy premade “hat pads”, but uh, this is way more fun and original


you need...

-scissors
-black thread (color varies, depending on if you want it to blend in or not)
-needle
-small/medium feathers (i got mine fairly cheap from http://www.tonyhill.net/, but there are plenty of companies that sell them)
-backing fabric (leather seems to work best because it's sturdy)
optional - a thimble might help if you have sensitive fingers/a hard time pushing through the leather and feathers


http://www.craftster.org/pictures/showphoto.php?photo=177109&ppuser=140768
you want to cut a teardrop shape about 4 inches (or whatever size you want it to be...) that's even on both sides (fold it in half it helps)


Thread a *really* long needle. It’s a lot easier to not have to worry about running out of thread while doing this, and to not have to change thread. You should probably double the thread too, because it’s more supportive.


Pull out a big pile of feathers!


It’s easier to use ones like this that are fairly flat on the top


Lay a long, flat feather with the end facing the pointy side of the teardrop, and *important* curved down! You need the whole finished pad to curve towards your head, so you always have to face the feathers in a frown on the fabric.


Stitch right next to the base of the “stem” and over. Do this a few times around the stem in a few different spots. It also helps if you can sew one or two stitches actually into the base, but it can be hard to pierce.


It should look something like this. Keep in mind that the bottom will be covered up, so it doesn’t matter much if it looks messy


Lay two more feathers around the sides in a fanning out shape, and tack them down as well. (The same way you want the pad to be a frown lengthwise, you want it to be a little curved down widthwise as well, so try and find feathers that accommodate this)


Add three more feathers in a fan on top of this, lining the middle one up with the first feather you did, and covering the stitches. Tack them down too!


Keep adding more feathers in the fan layers


since I already made 4 or 5 already, I decided to change feathers and do a multicolored one, but normally you’d just keep layering until you reached the end, getting less and less feathers each “row” until you have just one with the “stem tip” matched up with the point of the teardrop

here’s what my finished one looked like


Once you do all that, you can attach it to a pin, clip, headband, or whatnot
I ran out of headbands, so I don’t have a tute of how to put it on the band! But I can put one up as soon as I get more headbands (if you do want to make one, I suggest fabric headbands for sure, I got mine from joyce leslie for really cheap)

Here’s some pictures of the headbands I’ve made though


And some clips Tongue


If you have any questions, I’d be happy to help!
Happy… feathering!?


**EDIT**
ok, so I finally got my stuff together, and took some pictures of gluing it to the headband, + a few new headbands I've made. For this, you need a hot glue gun, a few pins, a sharpie, and obviously, a headband (fabric works best)
hope this is what you needed!


line up your feather piece where you want it on the band


pin it down so it doesn't move too much


trace around the outside of your headband


pulling from the non pinned side, glue it down! Pull out the pin, and dab some on the other side as well


cut out another teardrop and glue it over the top so it's secure and so that your threads don't show

coool?

so, here's some more I've done recently. I bought some long feathers and tried experimenting w/ some layering, but there's one regular one too
excuse the disgusting faces on my part...


( think this kind of looks like a claw?)