Too Many Good Things Out There Not To Share Them With You!

Showing posts with label frugal. Show all posts

Friday, March 5, 2010

Stencil With Freezer Paper

I have been thinking of fun ways to use my cricut machine and one way is as a stencil. Seems easy enough right? Well here is something much less expensive than vinal paper which runs around $7.99 in craft stores. So I will be trying this bad boy out soon.

Stencil With Freezer PaperOne of the projects at this Friday's Chicago Craft Social will be freezer paper stenciling. I'm helping lead this table, so I needed to give it a test drive and make up some samples. You know how a project usually has four tedious steps you tolerate and one step that's super fun? I think this is one of the few where all of the steps are fun. Or maybe that's just me. I'm now in the grips of stencil mania. I'm stenciling everything.

To stencil your own stuff:
Buy a roll of freezer paper (approx. $3.99) or beg a piece from the guy in the meat department at your grocery store. Draw your design on it and cut it out with an X-acto knife. Then iron the paper, shiny side down, onto the fabric you're going to stencil. Iron another sheet to the back of the fabric to keep the paint from soaking through. You can use the iron setting that corresponds to the fabric you're stenciling.

With a foam brush, stenciling brush, kitchen sponge, or other paint brush, apply fabric paint to the cut-away areas. I used Jacquard brand textile paint from the local art store.

Let the paint dry (use a hairdryer if you're the impatient type, like me.) Peel the freezer paper off. Set the paint by following the directions on the jar — usually ironing will set it. Ta da.

Wednesday, March 3, 2010

All Things Family

I read quite the post and thought I would share. It only took me about 12 hours to look at all these fun blogs linked to this one. Enter at your own risk!


Welcome to the February 23, 2010 edition of the All Things Family blog carnival. This week, we focused on frugal and money-saving ideas. If you have an article that you would like to submit for a future edition, please check out the All Things Family Blog Carnival.


Frugal Ideas for Parents:

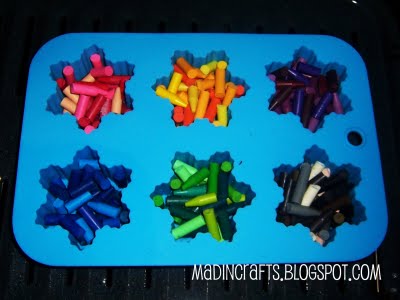
Jessica Hill, one of my favorite dollar store crafters, presents mad in crafts: Make crayons with dollar store molds posted at mad in crafts, a good use for those cute novelty molds they always have at the dollar store.
Here’s a fun and frugal idea! Abigail Bailey presents Make children’s play furniture from milk cartons posted at abigailscraftshowto.com

Shannon presents Low Cost Party Planning Solutions posted at Partyelf, saying, “Here are some low cost solutions to planning a great birthday party for your child,” and provides ideas for Personalized Party Favors on a Budget posted at Partyelf, saying, “Getting personalized party favors for your child’s birthday party does not have to cost a fortune. Here are some low cost ideas starting around $1.”
Speaking of parties, Char Polanosky sent us ideas for 5 Ways to Save Money on Kids Party Decorations posted at Celebrate It, saying, “Creative ways to stretch your birthday party budget!”
Char Polanosky presents Making Kids Lunch Fun with Bento Box Lunches posted at Raising A Healthy Family, saying, “Save money by packing your kids lunches in fun bento style containers.”
Linette G. presents some super cute cupcakes  How To Train Your Dragon~Viking Hat Cupcakes posted at The Kid’s Birthday Fun Review, saying, “These cupcakes are quick and easy, perfect to make just for fun or for a How to Train Your Dragon Party.”

Family Potluck:

Mariana Ashley presents 50 Incredible Ikea Hacks for College Kids posted at AccreditedOnlineColleges.org .
Pamela Jorrick presents Personality posted at Blah, Blah, Blog, a discussion of personality types and how they apply to her.
Gina @ MoneywiseMoms presents Guest Post: Retirement Savings for Stay-at-Home-Moms posted at Moneywise Moms

Karen Eisenbraun presents Plant A Garden For Healthier Children posted at Healthy Theory.
Fred Lee presents Your Public Library: Better than Disneyland posted at Parenting Squad

Sandra Lopez presents 80 Awesome Ideas for All Your Old or Unwanted Books posted at Online Colleges.net

Dana presents An encounter with owls posted at Roscommon Acres, a blog about a nature walk with her children and what they found.
That concludes this edition.

Monday, March 1, 2010

Wall Art Display

 As the thought of an upcoming foster child continues to cloud my mind I was thinking of the ways I could encourage and foster lots of self esteem for the little person God brings us. Displaying and showing we are proud of this little person I know will be so important so here's a little post from How Does She blog. She has some great tips for displaying artwork and I'm sure there will be lots of it around our house! 

How Does She display kid’s art?  I knew I could find a few ideas, I had no idea I would find this many!!!  I am excited to present all these awesome ideas – I am so inspired to get my kids to make more art, just so I can display it!

 #1 Collage It

way to display kids artThis is Alison’s idea to take lots of art, shrink it on the computer and put it into one collage.  Child’s art 18 into 2!

#2 Group together on the wall

I love this idea because it is so easy to update whenever you want and it looks GREAT!
kids drawings as art
 The Style Files shares this picture.  I love all the colors against the white wall.    You can get these curtain holders at Ikea, not online, unfortunately, but if you live by one – lucky you!
work of art lofn
 The Land of Nod
art on wall
display kid art 2
display art magnet wall
display art photo
Cookiemag suggests taking pictures of the art and grouping the pictures together into a display on a cork board

#3 Treat it as art

This frame allows you to easily switch pictures and even store some behind the most recent art being displayed
art display zebra
Blissfully Domestic has a great tutorial on displaying framed art.
art on canvas
Turn it into art on Canvas!!!  This is one of my favorite ideas – pretty much anything on canvas just looks classy.
mykidsartoncanvas has the idea above on their website, you can order from them

OR
get it for free at Canvas People – click here!


 Turn it into custom wall paper art, a laptop skin, or a removable sticky picture at SticViews - You can still get one free – see this post to find out how!
Turn doodles into a real work of art - Lizette from Fine Doodles display art fine doodles.jpgdoes some amazing work with your kid’s doodles – you gotta check out her website!

#3 Take it with you and show it off!

display art jewelry 1
Analiese will turn it into a clay pendant for you
art display silver
or Totally out of Hand will turn it into silver or gold jewelry! 
display art bag
Snap Totes will turn images into bags or pillows – picture your kid’s art on the bag above.

Little Birdie Secrets has a tutorial on how to turn you child’s drawing
art display monster 1
into a stuffed toy
art display monster 2
I made one for my son and he thinks it is the coolest thing! 

Other ideas I found but don’t have pictures for are:

shrink and mod podge onto coasters
Use clipboards as frames – easy to change out
hang them all over your garage walls
use them for wrapping paper
display on picture ledges
upload them to a book printing company and have a nice book of art
laminate them and use as placemats
turn them into a calendar – click here to see how to get a FREE ONE
 cover your coffee table w glass and slide drawings underneath
use a plastic tablecloth over your dinner table and slide drawings underneath
have them made into postage stamps
cut up and use as gift tags

Wednesday, February 24, 2010

Batch Cooking from Simple Bites

Back to the Basics: Batch Cooking

Post image for Back to the Basics: Batch Cooking
Photo by Martin Kingsley
Quite a few of you mentioned that you’d like the topic of freezer meals and batch cooking covered in our Back to the Basics series. I’m definitely not an expert in this field, but it’s something I want to incorporate more in my own home management, so this is a refresher post for me as well.
Cooking in advance has the serious advantage of saving time and money. You’ll waste less food (especially the perishables), and you’ll save money by doubling up your efforts on the spoils brought home from the store.
It’s also healthier, because you won’t need to buy convenience foods that are chock full of MSG, preservatives, sodium, and other unpronounceable chemicals.
There are a few methods of batch cooking, but essentially, it involves cooking a lot of food in advance. You can cook enough food to warrant freezing and stockpiling, and you can prepare scratch ingredients, helping you to cook without the fake ingredients found in so many store-bought items.
Here are a few tips for the different methods of cooking ahead of time.

Freezer Meals

Freezer meals are entire meals prepped in advance, and then frozen for later use. They can ether be completely cooked, so that all they need is thawing and reheating, or you can prepare most of the steps in advance, so that all that’s left is cooking the meal.

Advantages:

This is a great time saver. You can stockpile loads of meals for future use, such as when you’re expecting a newborn in your life. Or you can simply have a few meals on hand, so that when life is a bit busy, all you need to do is shop your freezer.

Disadvantage:

You need the space. If you want to do freezer meals hard-core, you might want to check your local Craigslist to find a used deep freezer for your garage. I have a simple second freezer in the kitchen (it’s the size of a compact fridge that’s popular in college dorms). It provides some extra space, but not a ton.

Helpful Tools:

Plenty of freezable dishes, such as those foil casserole dishes you can find in your grocery store. I prefer large resealable plastic bags because they take up less space. Vacuum sealers are great, too, though I don’t have one.

Good Freezer Meal Recipes

Chicken Nuggets
Fannie Farmer’s Classic Baked Macaroni and Cheese
Beef Stew
Chicken Tetrazzini with Caramelized Onions (make the alfredo sauce from scratch – it’s very easy)
End of Summer Vegetable & Fresh Herb Casserole
One Skillet Lasagna
Chicken Enchiladas
Spinach Black Bean Lasagna
Ground Beef and Tomato Manicotti
Chicken and Wild Rice Soup
You can also search the freezable meals at My Recipes or the make ahead recipes at Whole Foods.

Once A Month Cooking

Some families cook all their meals for the month in one day. I haven’t personally done this, but I hear it works well when you plan in advance and you have extra hands to help.
You can create a two-week menu plan, then buy all your ingredients on one shopping day. Get your perishables and produce at the farmer’s market, and everything else at the grocery store.
Make sure you double all the amounts for each recipe, so that you have enough for the month. You could even quadruple the recipes and have plenty for lunch.
Then you clear an entire day early in the month, and cook, cook, cook. It’s a tough day, but then you’re done for the month! Freeze the meals, label and date them well, and all you have to do is thaw, reheat, and serve.

Cooking & Freezing Staples from Scratch


Photo by thebittenword.com

Even if you don’t like the idea of freezing entire meals in advance, you can still batch cook and freeze staple ingredients.

• Once or twice a month, roast a whole chicken, then cube the meat and store it in half cup or whole cup quantities in resealable bags. Label the quantity and date — you might think you’ll remember, but believe me, you won’t.
• Now, you’ve also got plenty of chicken broth to freeze. Also store this in whole cup quantities, and label it well.
• I also like to match batches of homemade cream of chicken soup, and freeze for recipes later. The stuff in boxes and cans are chock full of fake ingredients and sodium.
• Brown and drain ground beef the day you buy it at the market, and you can also store this by the cup for freezing. This way, you’ll also use less meat per meal, because it’ll be an ingredient instead of the main feature.
• I also like to throw dried pinto beans into the Crock Pot to make a simple side dish that will last us about two weeks. You can mash them into refried beans, too.
• We’ll get to canning later, which will cover lots of veggies and sauces. But you can also make basic marinara sauce, pizza sauce, and salsa in bulk, and freeze them for later. Jump on these things now, while tomatoes are abundant, fresh, in season, and cheap!
It can feel overwhelming if you try to jump on all these ideas at once, so just pick one or two, and gradually add more freezer meals to your agenda. For me, I’ll be freezing my chicken ingredients, ground beef, and a few meals for the next few months.

Thursday, October 29, 2009

Cleaning My Face the Right Way

When my husband ends up calling me frugal mc-froog I imagine an award for frugal lady of the year. Enter applause. But clearly the frugal award would probably just be a piece of paper with woo hoo! written on it in true frugal fashion. So when I tell you about this don't think me crazy. I can actually say after trying this it works. I found it over here at simple mom.

The skinny version is you use mostly natural ingredients to clean your face. I have a friend that makes her own laundry detergent which I fully intend on trying which made me brave enough to try this but back to the face wash. The whole idea actually makes pretty good sense. When you strip the skin on your face of natural oils by using face wash you actually do more damage than good. Your 'kind' little pores then produce double time to make up for the lack. This can account for most of the oil many people find on their face.


So here's the REALLY simple formula I used. I put together 3 parts castor oil (I have pretty oily skin) which to try out I used 3 oz. and 1 part extra virgin olive oil (1oz.). I just used an old eye make-up remover bottle to put it in. Well friends, this skeptic was happily eating a little humble pie afterwards. You can pick up castor oil for about $2.50 at Wal-Mart in the pharmacy area and you know where EVOO is.


My review. It felt extremely weird to actually put oil on my face in stead of suck it all out (literally have tried that by the way). Years of hating on my face I suppose made it feel pretty ikeey. But after I rubbed it in and wiped it off with a warm wash cloth my skin felt a-mazing. It was so smooth and healthy looking. I have been using it for a few weeks now and I'm pretty much never going to use the other stuff again. It was a fantastic eye makeup remover too. Better than most of the high end stuff I have tried and tons less expensive.  Blemishes are caused by built up nasties in pores so when you wash with wonder oil (that's what I'm calling mine) you actually get all that yuck out. 

All this goes to show I can't judge something as ridiculous just because I have been fed the consumer pooh-pooh. And if Mr. Phillips wants to call me fruga mc-froo I guess we're none the poorer for it!