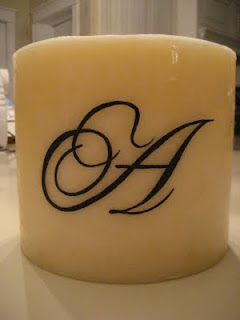
I have had a long love affair with monogrammed anything for some time now. My favorite is to see things from Pottery Barn that are monogrammed and L.L Bean is a close second. Maybe it's a southern thing or the fact that it looks really clean but I really like it. We, at the Phillips house, love to give monogrammed gifts as well so I found a really sweet and easy monorammed candle that is so very inexpensive. Found this little dandy over at
Life on Grace blog. By the way, can you believe it is almost the middle of November? There are times I wish we could just freeze time and look at it a little. I guess it is a reminder of how finite we are.
Anyway, here is how you can do this cute candle.
Products: Glass and Tile medium, black acrylic craft paint, and a tiny paint brush. All these items should cost you arouns $3-$5 at a craft store.
A candle (my current favorite is this brand from Bed, Bath and Beyond). Candle manufactures come and go, as soon as I fall in love with one they will stop making it. Try out a few and see what works best for you. There are lots of great, affordable candles out there. Big lots can have great deals on candle packs or the Dollar Tree (you know I love them!).


Step 1: Now that you have your materials, print out a letter (or letter's' if you would like a triple monogram) off the computer in the font that you would like for your monogram. Position and center the letter on the candle. Hold the letter in place and trace the letter onto the candle with light, but firm pressure. I like to use the point of a mechanical pencil for this step because it carves a thin line onto the surface of the candle. Remember, some candles are softer than others, so take care to not press too hard which would result in large, deep lines in the candle. I will tape mine on because I don't have surgeons hands by any means!
Step 2: Paint on a very thin coat of the Glass and Tile Medium over the monogram on the candle as shown below. This coat will dry slightly "milky" so be sure to use a thin coat. Allow about 15 or 20 minutes to dry.
Step 3: Using your thin paint brush, paint over your carved letter with black paint. Keep your hand as steady as you can, and paint the letter to look as much like the letter you printed off the computer as possible. I would think you can try a paint pen for this too it just depends on the look you want.
Step 4: Once you are satisfied, allow the paint to dry for at least 30 minutes before wrapping the candle. These candles look lovely wrapped in clear plastic cellophane wrap, tied up with festive ribbon. I keep lots of ribbon on hand, by simply changing the ribbon it becomes a great, unique gift for lots of different occasions. Just think they could be used for a baby shower gift for mom, Christmas, Teacher Gift, Valetine's Day... -- the possibilities are endless.
Don't be afraid, you can do this! This is a simple way to create lots of affordable and personal gifts. People will love receiving them and they will enjoy many hours of the calming serenity that candlelight can bring into a home. Have fun! And don't get me started on how much I love cellophane to put around them!
 One of the projects at this Friday's Chicago Craft Social will be freezer paper stenciling. I'm helping lead this table, so I needed to give it a test drive and make up some samples. You know how a project usually has four tedious steps you tolerate and one step that's super fun? I think this is one of the few where all of the steps are fun. Or maybe that's just me. I'm now in the grips of stencil mania. I'm stenciling everything.
 With a foam brush, stenciling brush, kitchen sponge, or other paint brush, apply fabric paint to the cut-away areas. I used Jacquard brand textile paint from the local art store.
 Let the paint dry (use a hairdryer if you're the impatient type, like me.) Peel the freezer paper off. Set the paint by following the directions on the jar — usually ironing will set it. Ta da.




 Posts
Posts


